Sitting for long periods of time is never a good idea; it can lead or contribute to many health issues including obesity, increased risk of cancer, shorter life spans, and long-term posture problems. But for some, it’s a part of their daily life, primarily those working a desk job that requires sitting at a computer all day. While it is recommended to take breaks and walk away (literally) from your work throughout the day, some people just don’t have the time to do that. That’s where an adjustable height table mechanism comes in, letting you stand and stretch your legs without leaving your desk and losing valuable work time.
With our FLT-02 Table Lift Set, you can turn your desk into a height-adjustable standing desk with easy up/down motion control. Today, we are going to show just how simple it is to install and build a standing desk. We also have many other types of table lifts in our range that you can use in your project – click here to check them all out.
How to Build Your Own Adjustable Standing Desk
All you need for your DIY standing desk is our FLT-02 automated table lift, a desktop, and a screwdriver – that’s it. Our table lift comes with everything needed for installation including all the required screws, brackets, and cable clips for hiding the wires (desktop and screwdriver not included).
Take a look at some important specifications of our table lift set before starting the assembly procedure:
- Height range is 23.6" – 49.1".
- Base width is 39.6" - 74".
- Moves at a speed of 1.57"/sec.
- Can support up to 270 lbs.
- Weighs 65 lbs (not including the desktop).
Step One
Start off with assembling the desk elevator set: you can refer to our FLT-02 PDF for full step-by-step instructions on the assembly procedure. Assembling the unit should take 20 minutes or less. Once it’s assembled, make sure to test the remote control by raising and lowering the motorized table lift.

Step Two
With the motorized desk lift assembled, you’ll now want to flip it over and place it on the underside of the tabletop. We recommend having at least two people to flip the two-column desk lift mechanism set as it is quite heavy. Once it’s on the desk, adjust the width of the table lift to fit your tabletop using the crossbar center rails. We suggest leaving at least a half-inch overhang of the width of the desktop over the lift set. Once you are satisfied, you can go ahead and secure it in position with the included screws.


Step Three
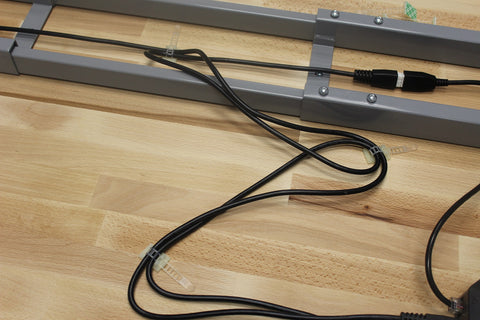
Now it’s to time to secure the power supply and hand remote to the underside of the desktop. Place them wherever you prefer and use the included screws to secure them in place. Use the cable clips to secure and hide the wires from view (and so they aren’t loose and hanging from the desktop once the standing desk mechanism is flipped over).

Step Four
With everything secured and ready to go, you can flip the fully assembled desk lift kit over. We recommend having at least two people for this. Before it’s ready for use you must reset the table lift mechanism. To do this just hold the ‘down’ button on the remote until the lift reaches its lowest point (slightly rises then stops). Once this happens, release the down button and your standing computer desk is ready for use.
Using Your Four-Position Memory Keypad
Depending on the remote you choose, the FLT-02 also features the ability to program pre-set positions so the lift will automatically move to your own custom positions with the press of a button. All you have to do is find your desired height, press the “M” button followed by a number 1-4. With that, your pre-set position is saved to whatever number you chose.

Final Word
Your fully automated desk lift system is now installed and ready for action! We hope you found this informative and left you inspired to build your own standing desk. If you'd like to order our FLT-02 Table Lift Set or any of our other table lift models, you can order online or contact us today. Stay tuned for more projects and guides like this in the future!


